
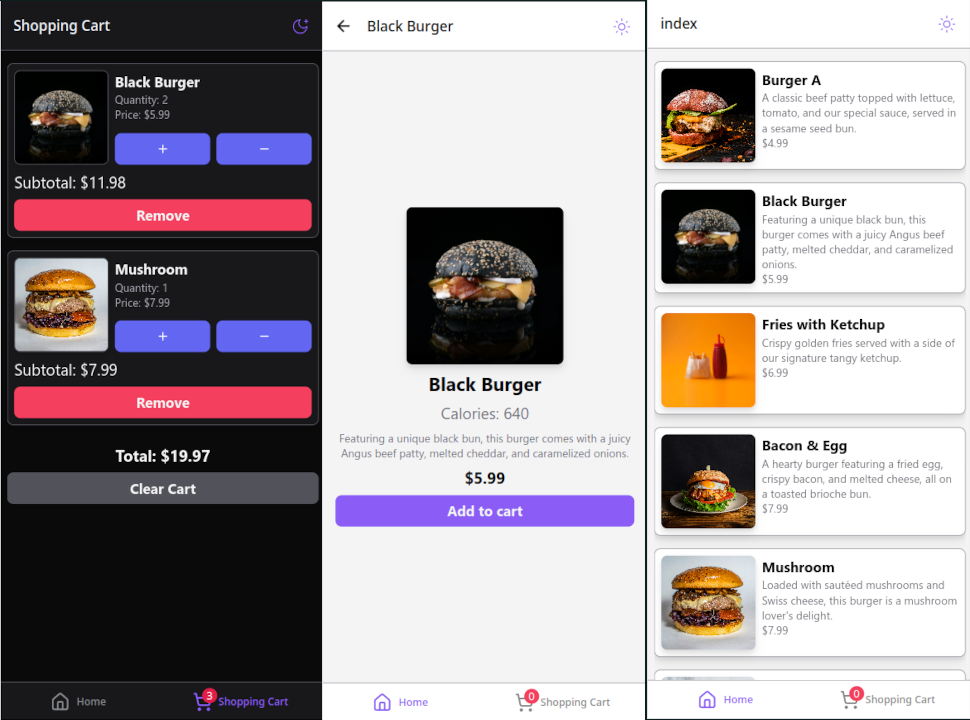
A while back I got an opportunity to do a take-home assignment in React Native. I had explored React Native before, but it was during its early days — before Expo had matured into what it is now. Coming back to it felt like meeting an old friend who's gotten their life together. The assignment was to build a simple burger ordering app called Burgerhub: browse a menu, view product details, and manage a shopping cart.
The Stack
I leaned into the modern Expo ecosystem rather than fighting it:
- Expo 52 with expo-router for file-based routing
- NativeWind for Tailwind CSS-style styling
- React Native Reusables for primitive UI components
- Zustand for state management
- sonner-native for toast notifications
- Jest + @testing-library/react-native for unit tests
The combo of NativeWind and React Native Reusables was immediately familiar. React Native Reusables is essentially shadcn/ui for React Native — it gives you unstyled, accessible primitives built on @rn-primitives that you own and style yourself. Coming from web dev where I use shadcn daily, it was a very comfortable starting point.
Screen Structure
The app has two tabs, set up in the root layout using expo-router's Tabs component:
<Tabs initialRouteName='(tabs)/(stack)'><Tabs.Screenname='(tabs)/(stack)'options={{headerShown: false,title: 'Home',tabBarIcon: ({ color, size }) => <House size={size} color={color} />,}}/><Tabs.Screenname='(tabs)/shopping-cart'options={{title: 'Shopping Cart',tabBarBadge: cartCount,tabBarIcon: ({ color, size }) => (<ShoppingCart size={size} color={color} />),}}/></Tabs>
The home tab wraps a nested Stack navigator — so navigating to product details pushes onto the stack while keeping the tab bar visible. The file structure mirrors this:
src/app/_layout.tsx ← root Tabs layout(tabs)/shopping-cart.tsx ← cart tab(stack)/_layout.tsx ← Stack layout for home tabindex.tsx ← product listproduct-details.tsx ← product detail screen
This is one of the things expo-router does really well. The folder structure is the navigation structure. No separate navigator files to maintain.
Home Screen
The home screen fetches products on mount via a Zustand effect and renders them in a FlatList:
export default function HomeScreen() {const { products, loading } = useAppStore();const { loadProducts } = useAppEffects();useEffect(() => {loadProducts();}, [loadProducts]);return (<SafeAreaView edges={['bottom']}>{loading ? (<ActivityIndicator testID='home-loading-indicator' />) : (<FlatListdata={products}renderItem={({ item }) => <ProductListItem product={item} />}/>)}</SafeAreaView>);}
Product Details Screen
Tapping a product sets it in Zustand's state as selected, then navigates to the detail screen. If selected is null (e.g. deep-linked without a product), the screen redirects back home:
if (!selected) {return <Redirect href='/' />;}
Adding to cart triggers a toast via sonner-native to give immediate feedback without cluttering the UI with alerts.
Shopping Cart Screen
The cart tab uses a SectionList (overkill for a single section, but it made adding a sticky footer total and clear button straightforward). The tab badge in the root layout is driven by reducing over the cart state — so it updates reactively whenever anything is added or removed.
Zustand with an Actions/Effects Split
One pattern I settled on for the store was separating pure state mutations (actions) from side-effectful operations (effects). The store is structured as three files:
state.ts— initial state shapeactions.ts— synchronous state setters (addToCart,setProducts, etc.)effects.ts— async operations that compose actions and trigger toasts
export const useAppStore = create<AppStore>((set, get) => ({...initialState,actions: createActions(set),effects: createEffects(set, get),}));export const useAppActions = () => useAppStore((store) => store.actions);export const useAppEffects = () => useAppStore((store) => store.effects);
This made testing much easier. Actions are pure functions — given a state, they return a new state. Effects are where the API calls and toasts live. Keeping them separate means I could test actions in isolation without mocking any async behavior.
NativeWind + Dark Mode
NativeWind works by running Tailwind's compiler against your source files and converting class strings into React Native style objects at build time. It pairs with a useColorScheme hook from NativeWind to drive dark mode:
export const useColorScheme = () => {const { colorScheme, setColorScheme, toggleColorScheme } =useNativewindColorScheme();return {colorScheme: colorScheme ?? 'dark',setColorScheme,toggleColorScheme,};};
The ?? 'dark' fallback means unresolved color schemes default to dark — a personal preference. The theme toggle in the header calls toggleColorScheme() and NativeWind handles propagating the change through the component tree.
One thing to keep in mind: NativeWind uses className on native components the same as web, but some Tailwind utilities don't map 1:1 to React Native layout. I ran into a few cases where I had to fall back to explicit style props for things that just don't exist in React Native's layout model.
Testing with the Expo Go App
For manual testing during development I used the Expo Go app on my phone. Running pnpm start gives you a QR code — scan it and you're running the app live on device. Hot reload worked reliably throughout the build. Being able to test on a real device without setting up a simulator or Android emulator was a genuine quality-of-life win.
For automated tests I used Jest with the jest-expo preset and @testing-library/react-native. The tests cover each screen's loading/empty/populated states and the store's action logic:
it('renders the product list when products are loaded', async () => {render(<HomeScreen />);await waitFor(() => {expect(screen.getByTestId('home-products-list')).toBeTruthy();});});
Takeaways
The Expo ecosystem has grown up considerably since I last touched React Native. expo-router brings the same mental model as Next.js App Router to mobile — if you know one, the other clicks quickly. NativeWind makes styling feel native (pun intended) to anyone with a Tailwind background, and React Native Reusables fills the component primitive gap that shadcn fills on the web.
The biggest adjustment was remembering that React Native has no DOM. No CSS grid, no position: fixed, no browser events. The layout primitives are flexbox-first and everything is a native view. Once that mental model shifted, the rest followed naturally.